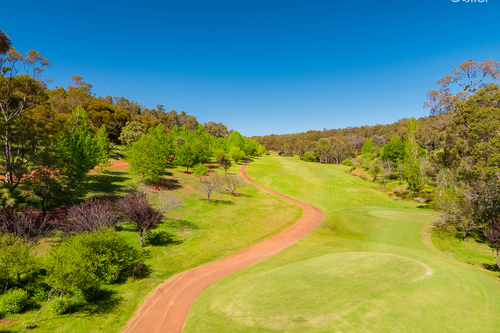
Araluen Estate Golf Course
(3)
  • AGR_Hero_Image_1.jpg
    • Par 72
    • 18 holes
  • AGR_Hero_Image_2.jpg
    • Par 72
    • 18 holes
  • AGR_Hero_Image_5.jpg
    • Par 72
    • 18 holes
  • Araluen-1-3.jpg
    • Par 72
    • 18 holes
  • Araluen-1-2.jpg
    • Par 72
    • 18 holes
  • Araluen-1-14.jpg
    • Par 72
    • 18 holes
  • Araluen-1-20.jpg
    • Par 72
    • 18 holes
  • Araluen-1-24.jpg
    • Par 72
    • 18 holes
  • Araluen-1.jpg
    • Par 72
    • 18 holes

Course


Hole 1

Blue

  • Par: 5
  • Distance: 506 m
  • Index: 9

White

  • Par: 5
  • Distance: 466 m
  • Index: 9

Red

  • Par: 5
  • Distance: 435 m
  • Index: 9

The first hole is a par 5, gently uphill to a large green protected by three bunkers. The ideal tee shot is up the left side of the fairway to open up the green for a strong second shot. A wayward shot will encounter problems with trees and shrubs.

Hole 2

Blue

  • Par: 4
  • Distance: 327 m
  • Index: 14

White

  • Par: 4
  • Distance: 309 m
  • Index: 14

Red

  • Par: 4
  • Distance: 284 m
  • Index: 13

A short downhill par 4, dog-legging to the right around a yawning fairway bunker.

Two bunkers protecting the green allow for a tight pin positions which can only be accessed by accurate pitch shots to a green which slopes gently downwards to the rear.

Hole 3

Blue

  • Par: 4
  • Distance: 372 m
  • Index: 2

White

  • Par: 4
  • Distance: 359 m
  • Index: 2

Red

  • Par: 4
  • Distance: 292 m
  • Index: 2

A strong uphill par 4, dog-legging to the right.

The tee shot is guarded only by trees, while the approach shot to the elevated green must negotiate a cavernous bunker on the right side and another bunker at the left.

Hole 4

Blue

  • Par: 3
  • Distance: 160 m
  • Index: 18

White

  • Par: 3
  • Distance: 132 m
  • Index: 18

Red

  • Par: 3
  • Distance: 119 m
  • Index: 18

A downhill par 3 to a wide green sloping gently to the rear and protected by two bunkers in the front and one behind.

Do not overclub here, beucase there is dense bushland at the back of the green which could be costly for the unwary.

Hole 5

Blue

  • Par: 4
  • Distance: 371 m
  • Index: 4

White

  • Par: 4
  • Distance: 357 m
  • Index: 4

Red

  • Par: 4
  • Distance: 313 m
  • Index: 7

A straightaway par 4, gently uphill with a series of fairway contours.

An accurate drive up the left side, flirting with a deep fairway bunker will open up a well protected and subtly contoured green, for the approach.

There are bunkers on both sides of the green and shrubbery behind it.

Hole 6

Blue

  • Par: 4
  • Distance: 410 m
  • Index: 6

White

  • Par: 4
  • Distance: 384 m
  • Index: 6

Red

  • Par: 4
  • Distance: 337 m
  • Index: 6

This is a strong par 4.

The tee shot, along level ground, should ideally be played right of centre.

A drive over a large fairway bunker on the right side of the fairway will provide the best line for a downhill approach to a green which is angled around a bunker at front left.

Hole 7

Blue

  • Par: 16
  • Distance: 185 m
  • Index: 3

White

  • Par: 16
  • Distance: 166 m
  • Index: 3

Red

  • Par: 15
  • Distance: 138 m
  • Index: 3

A longer par 3, downhill to an angled green bisected by a narrow ridge running across it. The views beyond the green are enchanting, but concentration must be maintained to avoid the tree bunkers guarding the green and the steep back slopes behind.

Hole 8

Blue

  • Par: 5
  • Distance: 524 m
  • Index: 12

White

  • Par: 5
  • Distance: 498 m
  • Index: 12

Red

  • Par: 5
  • Distance: 442 m
  • Index: 10

The longest hole on the course.

The drive uphill with large fairway bunkers left and right on a right hand dogleg.

Few players will reach the green in two when the sea breeze is blowing.

When the easterly is blowing, a blind shot played with a draw will best find a green which is guarded in the front by a swale on the left side.

Hole 9

Blue

  • Par: 4
  • Distance: 398 m
  • Index: 10

White

  • Par: 4
  • Distance: 364 m
  • Index: 10

Red

  • Par: 4
  • Distance: 310 m
  • Index: 4

The final hole of the outward nine is a real showpiece. The hole plays downhill to the lake which guards the green. For the long hitters, an iron from the tee is a safer option.

A solid tee shot, hit right of centre will find a downslope and gain sufficient extra length to finish close to the lake, leaving the player with a short iron to the green. A marshy hazard awaits for tee shots pulled or hooked to the left.

Hole 10

Blue

  • Par: 4
  • Distance: 308 m
  • Index: 17

White

  • Par: 4
  • Distance: 285 m
  • Index: 17

Red

  • Par: 4
  • Distance: 260 m
  • Index: 17

The tenth hole is a drive and pitch par 4. The drive is uphill with the hole dog-legging to the left around two imposing fairway bunkers. The idea drive is down the right hand side to avoid the bunkers and open up the dogleg. The subtly contoured green is protected by two bunkers.

Hole 11

Blue

  • Par: 5
  • Distance: 519 m
  • Index: 13

White

  • Par: 5
  • Distance: 486 m
  • Index: 13

Red

  • Par: 5
  • Distance: 442 m
  • Index: 8

This eleventh runs to the north along the west side of a ridge which offers magnificent views towards the coast.

A good drive will afford the player the option of laying up to the right of a crescent of three bunkers down the left side, or fading a strong second shot onto a green angled from left to right along the side of the ridge.

Hole 12

Blue

  • Par: 3
  • Distance: 173 m
  • Index: 9

White

  • Par: 3
  • Distance: 160 m
  • Index: 9

Red

  • Par: 3
  • Distance: 141 m
  • Index: 12

The green of this 173 metre par 3 hole lies sandwiched between two large bunkers in front and one behind. The back bunker provides an enhanced perception of distance, which is vital for the player, because immediately behind the green is the valley with a backdrop of hills in the distance.

Hole 13

Blue

  • Par: 4
  • Distance: 388 m
  • Index: 5

White

  • Par: 4
  • Distance: 350 m
  • Index: 5

Red

  • Par: 4
  • Distance: 311 m
  • Index: 3

The thirteenth hole is a long uphill par 4. The fairway slopes down to the left. It is necessary to drive right of centre alongside a fairway bunker to provide a view of and a good line to the green, which is angled from right to left, and protected by a deep front bunker on the left side.

Hole 14

Blue

  • Par: 4
  • Distance: 366 m
  • Index: 7

White

  • Par: 4
  • Distance: 340 m
  • Index: 7

Red

  • Par: 4
  • Distance: 305 m
  • Index: 11

A fairway bunker on the inside of a left dogleg will ensure that a good tee shot is needed to reach the start of a down slope to the green of this mid length par 4.

The second shot must be accurately placed between two greenfront bunkers. The green is not deep and care must be taken not to go through the green and down the steep backslope.

Hole 15

Blue

  • Par: 5
  • Distance: 506 m
  • Index: 11

White

  • Par: 5
  • Distance: 466 m
  • Index: 11

Red

  • Par: 5
  • Distance: 435 m
  • Index: 14

The only hole without any bunkers. The strategy is provided by strategic visual mounding. A tee shot to the left of the fairway will find the green obscured by a greenfront mound, whilst a drive to the higher right hand side will provide a full view of the green. Correct club selection is very important here.

Hole 16

Blue

  • Par: 3
  • Distance: 165 m
  • Index: 15

White

  • Par: 3
  • Distance: 153 m
  • Index: 15

Red

  • Par: 3
  • Distance: 130 m
  • Index: 16

A spectacular one shotter from tees high above the green. The back tee is thirty metres higher than the putting green, which lies behind a series of ponds, with a large irrigation lake below to the left. Club selection is difficult as the height provides greater influence by the wind. The green is generous and is bisected by a gentle ridge from back to front.

Hole 17

Blue

  • Par: 5
  • Distance: 506 m
  • Index: 3

White

  • Par: 5
  • Distance: 466 m
  • Index: 3

Red

  • Par: 5
  • Distance: 435 m
  • Index: 5

A beautiful par 5 which runs up a valley with the fairway sloping down to a stream meandering down the right side. For the strong player, a well hit tee shot will allow the decision whether to lay up short of the creek that crosses in front of the green, or to go for the green with the second shot. The green is ringed by a series of pot bunkers at the rear and playing out of these towards the creek is fraught with peril!

Hole 18

Blue

  • Par: 4
  • Distance: 395 m
  • Index: 1

White

  • Par: 4
  • Distance: 370 m
  • Index: 1

Red

  • Par: 4
  • Distance: 332 m
  • Index: 1

The finishing hole continues the gentle ascent up the valley. The creek meanders along the left side of the hole past a grove of poplar trees and crosses the fairway just past the left hand dogleg. A firm tee shot to the right side will give an enhanced view of the green lying to the left of a walled pond with bunkers behind and to the left side. Do not push or slice your approach shot.

Enquire Now